How to Avoid 10 Common Mistakes in WMS Implementations: Part 3
April 11, 2013 by The Bridge Solutions Group Team
Topic 3: Lack of Risk Planning
In our initial article we presented 10 common mistakes made during the implementation of any WMS application. This article is the third installment in the series and will focus on the issue of ‘Lack of Risk Planning.’
In our opening article, we stated that incorporating a Risk Plan within the overall implementation plan is vital. Many WMS implementations exclude risk planning and as a result, fail to meet implementation schedules due to the fact that they fail to predict the “what if” aspects. In fact, projects without Risk Management Plans are significantly more likely to take longer, go over budget, and ultimately they may even fail.
To mitigate this, the Risk Management Plan (RMP) should be developed and approved even before the project begins. Failure to create an RMP up front is a little bit like forgetting to create a fire department in your town. Everything is fine until there is a fire. Then everyone will be running around screaming ‘every man for himself’ because no one knows who to call, or what to do. Even worse, they don’t have any of the tools or knowledge on hand to prevent the situation from escalating. Even when the fires do get put out, no one can assess the damage and get everything back on track.
Alas! Risk is part of any project and all Team Members must be made aware of the risks up front and know how to recognize the emergence of the risk and alert the Team to take action. This is where another common mistake generally happens. Everyone knows something is going wrong, but there is still a failure to take action!
The project manager should ‘facilitate’ the development of the RMP with each Team and with the Management Team. The RMP should identify the major “risks” for the project, the potential impacts or consequences and finally, a plan to either eliminate the risk or significantly reduce the potential impact. This is generally defined by a “Risk Matrix.” In general practice, the following risk management strategies are generally used within an RMP to categorize risk, though there are numerous variations.
- Accept the risk = Take a chance on the negative impact and adjust plans accordingly.
- Transfer the risk = Outsource the risk to specialists who are experienced in handling the risk and have the resources to minimize the consequences.
- Avoid the risk = Adjust plans to eliminate the risk or reduce the consequences to a minimum.
- Mitigate the risk = Take immediate action to lessen the impact.
Categorizing risk also helps define your response strategies a little more generally, so that unforeseen issues can still be categorized and summarily dealt with in a manner consistent with your overall risk strategy.
If you’ve bought into the idea of an RMP, then the next step is to figure out how to create one. Generally, there are 4 basic steps to creating a RMP:
- Identify the risks.
- Qualify each risk in terms of impact and probability of occurrence.
- Incorporate the risks within the project plan with triggers that activate the risk action plan.
- Create monitors that alert the project teams to the occurrence of the risk and actions to be immediately taken should the risk emerge.
- Continue to monitor the risks.
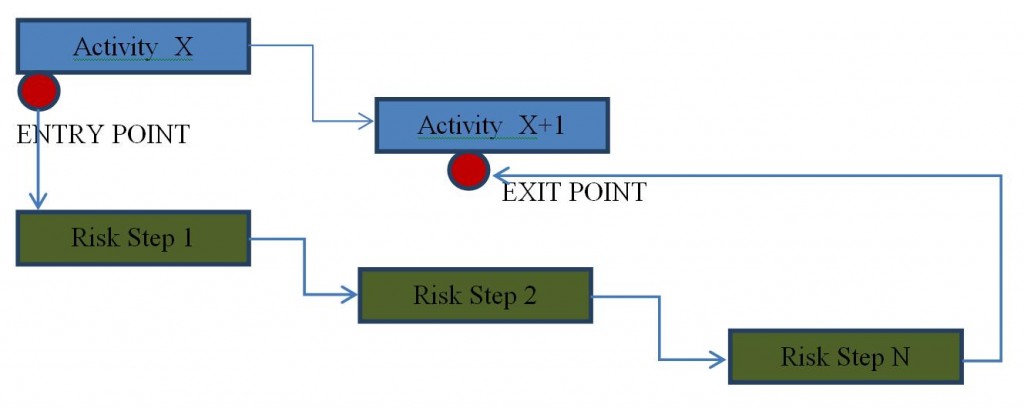
One of the best practices for a successful WMS implementation is the incorporation of the Risk Mitigation Plans within the actual project plan. The mitigation plan is in actuality a series of sub-steps within the project activity step that defines and assigns tasks that are intended to minimize the risk. The following is a basic representation of this concept.
In the illustration above, the risk actions have been incorporated into the project plan as a series of sub-steps that are triggered if the risk emerges as a realistic possibility. The main project activities continue in parallel with the risk action steps which have been designed to “mitigate’ the risk (minimize the impact).
An example might look something like this. Activity X is a planned data load and Activity X+1 is the validation that the data load was successful. In addition, there is an identified ‘Risk’ that during the data load there may be issues. If no issues emerge, then Activity X passes directly to X+1 (Validation). If an issue emerges, ‘Risk Step 1’ is triggered and the data is corrected. The data is loaded in Risk Step ‘N’ and flow continues back to Activity X+1.
There are hundreds of Project Risk Management and Project Risk Analysis templates available, and which one you choose is largely a matter of personal and organizational preference. The important thing is to select one that works well for the current project and integrate it early in the planning stage. There are even several add-ins for Microsoft® Project Management that seamlessly integrates a RMP into the project schedule.
Bridge Solutions Group understands that your business is unique, which is why we integrate our best practice knowledge with your organizational strategy seamlessly. We have the experience, skills, and resources to assist any organization in the development of a Project Risk Management Plan that is pertinent to their industry, software package, and business.
Filed under: Blog, Supply Chain

 For FREE insights into how to improve your supply chain, simply enter your contact information for access to our entire library of eBooks, whitepapers and data sheets.
 You'll be missing out on access to hundreds of pages of supply chain industry ideas and insights that will make you look great in your next meeting.